Collaborate, Build, Learn
Raspberry Pi Laptop
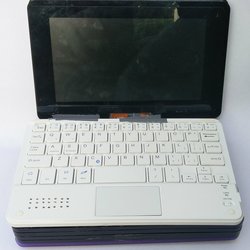
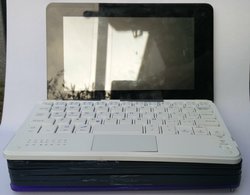
Ever since the Raspberry Pi came out in 2012, the one thing that seemed blindingly obvious to me was to make a laptop with it. Back when the model B was as good as you got, I made laptops-of-sorts from a variety of weird materials - usually broken chopping boards carved out with a hacksaw and with the cheapest eBay 7" TFTs (whose pixels I could probably count on my fingers). Then, as the Pi and it's community got bigger and better, I got a bit distracted by other things - tweeting gardens, fire pumpkins and the like. I planned an elaborate micro-laptop for last year's Raspberry Pi birthday party, but fell at the final hurdle as a power drill and my LiPo battery made contact the day before the party, and the magic blue smoke (and weird sweet LiPo smell) was released. I'm pleased to say that this year, version 1 of the Raspberry Pi laptop is existent! I wouldn't call it finished, but it is existent. My end goal is to make a laptop that you could actually use to do some real work. I haven't yet seen something that I would be potentially happy to use on a daily basis as my main computing machine - and as all the software is there and the Pi 3 is plenty fast enough for my needs, I think this problem lies with form factor. My end goal is to build something with a proper keyboard and trackpad (which this kind of has, albeit very small ones), a decent-sized screen (this one is tiny) and to be relatively thin (very much failed on this build!)
This blog-page-thing will cover roughly how I built it - it won't be a full-on tutorial, but it'll give you the gist.
Screen
Arguably one of the most important parts of a laptop is the screen - and this is usually one of the hardest parts to source. I'd already bought the official Raspberry Pi Touch Display at last year's birthday event - and the screen is a really lovely one. As well as being a nice relatively hi-res panel, it also has a glass touchscreen which is really key for this build (as I'll come to later). It also has some nice mechanical drawings which are available online and make the design process much easier, and has a good variety of mounting points. And lastly, it has a cable that's long enough to reach from the display to the driver board, if the driver board happens to be inside a laptop.
Keyboard and Mouse
Probably the only other hard part to source, this was the thing that started the idea for this laptop in my head. I was shopping around the Pimoroni website, when I came across this rather beautiful keyboard. It may not look particularly beautiful at first, but if you look at the dimensions, they are only a shade larger than the pi touchscreen. After some brief twitter chit chat, and wonky measuring, it emerged that the keyboard would indeed be a perfect fit. The keyboard also uses bluetooth - great, one less cable to add. However, if the keyboard doesn't connect you're stuffed - so the touchscreen's main appeal (other than fitting nicely) was that you can do the bluetooth config without a mouse and keyboard.
Battery, charger and power supply
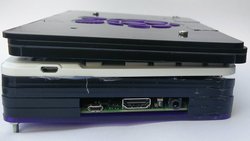
For the battery, I used a 4000 mAh LiPo battery that I had lying around from some disassembled item (I think a very bad tablet). I tested it and it worked fine - it should hold a charge fairly well. To charge it, I thought I could probably use the LiPo charger that was in the keyboard - this would save me having to find and wire up a new one, and also meant I didn't have to bother making a micro-usb shaped hole in the case. I tested it and (although it takes many hours to do a single charge) it works - that was good enough for me. To power the Pi itself, I used another Pimoroni product - the zero LiPo. This rather beautiful little board allows you to safely use 3.7v LiPo batteries to power a 5v Raspberry Pi, and can even trigger low battery warnings and auto-shutdowns (LiPos don't like it if you totally drain them - another thing I learned the hard way). This doesn't quite work - something I put down to either me being very tired and wiring it up wrong, or the fact that the zero LiPo can supply up to 1.5A, and the screen and pi together need a good chunk more than that. This is high on my priorities to fix, but for now I just end up plugging the pi into a USB power bank and having the LiPo power the keyboard. In the future, I think I'll just use a power bank for all the power, as it seems to work more consistently (and safely) than using my own fudged-together LiPo solutions.
Audio
One thing I really wanted the laptop to have was onboard audio - it's a pretty useless laptop otherwise. Luckily, Pimoroni have a board for that too, the speaker pHAT (see a theme here?). I wired this up with a lot of wires to the GPIO pins on the pi, and situated the board to the left of the trackpad, so that it could come through the top of the case. This worked briefly, until I messed up the drivers with another software install, so I think a new SD is required here. Pimoroni have also just released pHAT BEAT, a stereo version of the driver with MOAR BLINKY LIGHTS, so I think I'll use that in future builds. Finding a thin-but-half-decent speaker is a pretty big challenge in itself, so that was another reason to go with the speaker pHAT.
Case
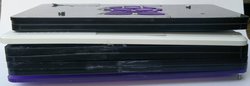
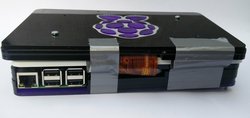
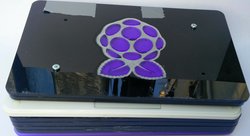
Here's the part where the Hackspace was immensely helpful - I made the case with our A2 60W laser cutter. The main part of the case is made from 5mm Black PMMA/Acrylic, with 3mm PMMA used for some of the top section, as well as the bottom panel and logo (which are frosted purple colour PMMA). As a whole, it worked very well. I made lots and lots and lots of tests in cardboard and paper (sorry trees), and got most of the layers right the first time I used plastic. There is a possibility I may have forgotten a method of attaching the layers together, but a power drill quickly rectified this. People always say you can never leave enough space for wires - and they have been proven correct yet again; despite me leaving a massive cavity for wiring it was a squash and a squeeze to get the case to close! I had planned on using screws into the original standoffs to hold the keyboard in place, but that didn't work out as the screws were too small so I ended up using our good friend hot glue.
Hinge
Hinges are always a bit of a pain for laptops and this one was no exception. The best I could come up with was a kind of self-regulating duct tape hinge but I really would like to improve that. Lots of people have suggested options - I think that 3D printing or leather sound like interesting avenues to try in the future.
Extras
Originally, I had plans to have LEDs in the lid (ran out of time), Neopixel / APA102 RGB indicators for stuff like CPU load (forgot about the idea), and GPIO breakout (lots of pins already in use). I would like to add these in the future, maybe to this laptop or another one.
What I learned
I learnt a lot in this build. Notably:
- There's nothing like the last minute to make you get on with something!
- Acrylic never stacks up perfectly
- Flat flex connectors are a total PITA
- Try not to put strain on ribbon cables
- Always leave much more space for wiring than you need
- No, really, leave lots of wiring space
- Always check the battery boost board can actually power your load
- Frosted purple perspex looks really good
The future
I ain't done yet! I hope to make another version (maybe for next Pi Party) to encompass some of the things I've learnt. My next frontiers to challenge are thinness and size- and the Pi Zero makes the thinness aspect a lot easier. I am trying to get hold of a screen bigger than 10.1" too, but we'll see where that goes.
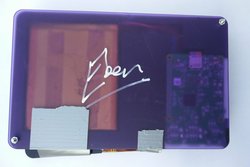 And I even got it signed by the inventor of the Pi himself!
Full high-resolution photos are available in this Google album.